WHOA. I have just discovered my newest awesome thing.... EMBOSSING BUTTONS!
Here's a little video (poor quality, I know, but hopefully full of enough information to make uploading the darn thing to my blog worth it) showing my process and the very first time I ever tried to do it (which was about 20 minutes ago... so I'm uploading it NOW so that I can go and play more while I'm waiting for the computer and blogger.com to get together and put the thing on my blog).
I would REALLY love to hear from anyone who benefited from this. There's something in me (probably the teacher in me) that just really loves to do little videos. If it's helpful at all, I'll keep posting more.
I'm also going to post some more pics pretty soon of other buttons I've embossed. I'm thinking of embossing some teal-ish/green buttons with copper to see if the green poking through will make it look antique-y. Anyway, anyway... I'm off to play some more.
Friday, July 31, 2009
Wednesday, July 29, 2009
JoAnn August Scrapbook Social Project
Here is the awesome project we're making in the August Scrapbook Social class at the Riverview JoAnn. The class is only $10.00 and will be on Friday, August 14, 2009 from 6:30-8:30.
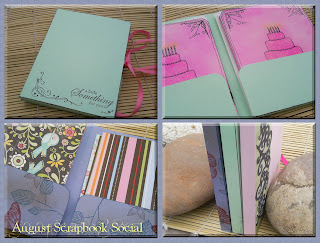
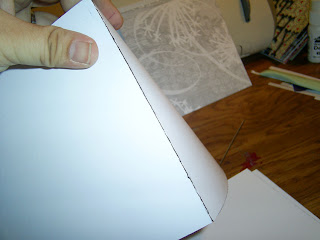
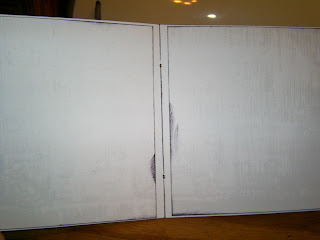
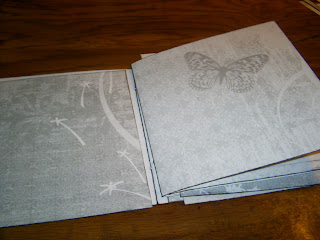
Basically, this project is a cardstock folder which is very easy to make from a single sheet of 8.5x11" cardstock. It will hold standard A2 cards (4.25x5.5") and envelopes. Add a ribbon for a perfect way to present a set of handmade cards to a friend! Also, you can see that I've started to use these folders to store pre-cut pieces of paper for my own cardmaking. They look so pretty all lined up in a row. AND I'm going to start using these to store my ever increasing stash of premade cards for various occasions: birthdays, sympathy, etc.
I'll be covering how to change the sizes of the folders, too, in order to create folders that will fit other sizes of projects, too!
I hope, if you're located close to me, that you'll consider signing up for the class! It will be a lot of fun!
Sunday, July 26, 2009
Cricut Tips--How to find the right size for your paper (without the software!)
I'm not going to pretend that this post is earth shatteringly amazing, but I think it at least qualifies as pretty neat. I was playing around with my Cricut the other day (much of this was birthed from talking with the ladies who came to my party on Friday night... thanks for letting me experience your brilliance for a while!) and figured out a new trick for finding the right size cut for a piece of paper.
Note: This isn't done with the software!!!! If you have the software, then good for you. The first smarty who posts that I need to get the software can feel free to buy it for me, mmmmkay?!
Basically, I make a lot of cards, and I really enjoy decorating the cards with somewhat large pieces from my Cricut. However, sometimes it's really hard to know what size to cut of a certain image. The first one I'm showing below is a good example.
FIRST, I've got to clear up what you're selecting when you're selecting the size of your image. This was one of those moments of brilliance from Friday that I just LOVE to experience when I'm around other crafters. A few of the other ladies who own a Cricut and I were talking a bit and I mentioned (with much agreement from them) that I had a really hard time remembering when I selected my size if it was selecting the measurement from top to bottom or from left to right. One of the ladies, however, spoke up and said, "Well, it's top to bottom, isn't it?" And I said, "But how do you know? I keep meaning to write it down, but I never do." And she said (genius!), "Well, when you cut a 2" letter, it's 2" tall. So I think it's top to bottom." And NOW I'll never forget. And if anyone is just laughing at me for being so naive, that's okay. But if anyone else is with me on this and having an epiphany moment right now, I embarrassed myself just for you and it was worth it.
Okay, okay...
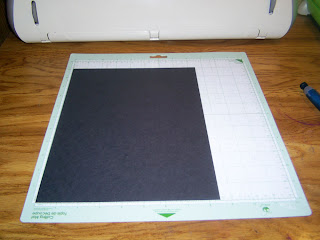
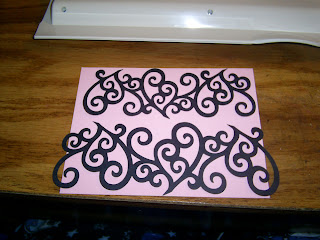
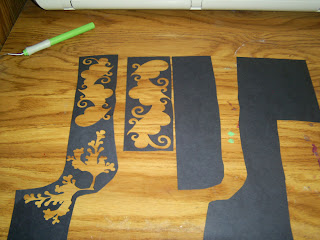
The thing I'm cutting right now is from the Storybook Cartridge. I'm cutting the swirlie twirlie border piece you get in the extras from the #2. If you look at the image, it's wider than it is tall. But I want it to go across a piece for a card. This is the kind of thing I'm talking about with figuring sizes--How do I know how tall to cut it when I don't know how wide it will end up being?
So, this is what I did...
 I set an 8.5x11" piece of paper in the bottom left hand corner. (8.5x11" is just what I had lying around... anything bigger than what I'm describing will work.)
I used my arrow keys and moved the blade to the left, to 7.5", then I moved it down to 6.25" and hit the "set paper size" button. It set the paper size as 4.5x5.75". Now, I know a standard card is 4.25x5.5", but you'll understand why I set it bigger in a sec.
Now that I've done this, I can hit the "fit to page" button. I'll select "Tall", then press "shift", and then press the "2" key. This will give me my swirlie twirlie border. Now, make sure (for your own future reference) that you're keeping a notebook right by you so that you can jot stuff down as you do this yourself, for whatever thing you're trying to cut to the size of your card or whatever, because when you hit "cut", you'll see the little screen says, "Calculating fit to page", then it shows you the size, which in this case is 2". It cuts the piece, fitting it to the 4.5x5.75" page size, which gives you a nearly perfect piece for the standard card which is slightly smaller because the Cricut NEVER cuts all the way to the edge of the page.
Now, keep in mind which edge you want your piece to align to (the 4.25" or 5.5" side). You may have to experiment a bit to find the right orientation for each project (you may need to have the blade go 6.25" left and 7.5" down instead, to get the card rectangle flipped). BUT, if you keep a notebook with you, like I said, you'll have the information for future attempts and will not need to go through all of this figuring again. AND... IT'S ONLY PAPER! You can recycle it if you mess up.
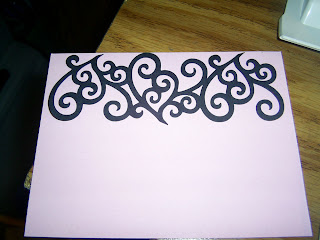
Below is the piece that the Cricut cut, which fit the card pretty nicely. Remember this is Tall, Shift, 2, set at 2". Now... this wasn't good enough for me at first. So I thought I'd try it at 2.25" just to see what I got, and see if it'd match better.
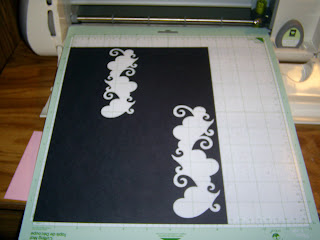
I put the paper back on my mat, but just let it be up in the corner, like you see below. I know that the piece I'm cutting isn't going to be too big for this paper, so I don't have to worry about aligning it in the bottom corner and setting the paper size. I'll just cut from here, the same image as above, at 2 1/4". (Make sure you turn "fit to page" OFF before doing something like this right after your last cut.)
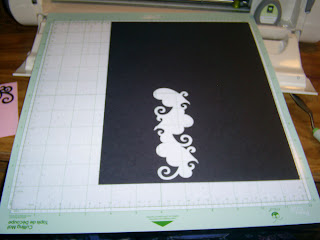
Okay, it turned out too big! So the other one is the one I love. I'll use the extra for something else at some point. OR, it could also be put on a card, but have the extra hanging parts cut off. You just have to decide which you'd like better.
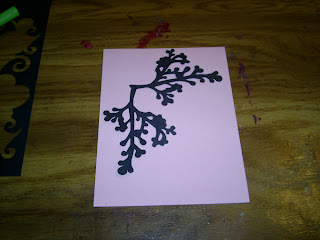
So I did those two things and figured I'd do one more thing on this paper. I aligned it in the bottom corner like I did at first and went over with my blade 7.5", then down 6.25", then set paper size to get my 4.5x5.75" piece of paper set in the Cricut. I chose a pretty branch corner piece. Once again, select fit to page, and then select your image. In this case, "fancy/corner", then "shift", then "Z". Again, before you press cut, get your notebook ready so you can remember the size once it pops up on the screen. I hit cut, then saw the size pop up as 4". Now I know that if I want to use this branch again, I need to cut it at 4" to fit well on a card.
Below is the picture of my branch. Pretty cool, huh? ^_^
Now, one of the things people talk about a lot is what to do with the leftover paper you have from cutting stuff on the Cricut. You can be uber savvy and save things for stenciling or something, but I've learned that if I save everything, I never use anything because I have too much crap piled around to find the stuff I want. Also, I've learned that as I file my scraps, it's really hard to file scraps that have all of these holes in them.
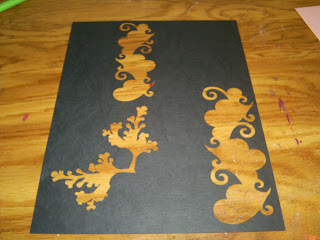
So, below you see I've cut the holey parts of the paper out. Anything reasonably large enough to use later for punched shapes or more cutting, I'll keep. Anything else, I recycle. I'll recycle the pieces with the holes and keep the strips, which are already in my plain black cardstock scrap file as we speak.
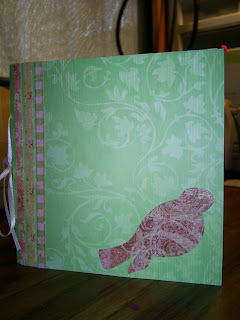
I figured I'd show the card I made with the branches here, too, since I messed with it a bit. I decided that I couldn't get just the right angle I wanted with the piece exactly as it was, so I cut it at the joining point and slightly angled the bottom piece.
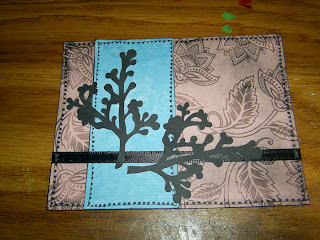
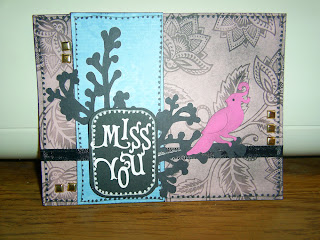
Then I stuck a cutesy thing on top. The letters are cut from the Storybook cartridge, too, using the Fancy/Corner option. I also cut the little bird from the Storybook cartridge. I thought it looked so cute, looking behind itself like that, almost like it is all solitary, looking for another bird. I like to use that one a lot on cards for missing people.
Okay, so thar she be. More tips to come, I'm sure... If you found this particularly helpful, please leave a comment. And if you tell me I need to get the software, you can refer to my comment above. ^_~
Note: This isn't done with the software!!!! If you have the software, then good for you. The first smarty who posts that I need to get the software can feel free to buy it for me, mmmmkay?!
Basically, I make a lot of cards, and I really enjoy decorating the cards with somewhat large pieces from my Cricut. However, sometimes it's really hard to know what size to cut of a certain image. The first one I'm showing below is a good example.
FIRST, I've got to clear up what you're selecting when you're selecting the size of your image. This was one of those moments of brilliance from Friday that I just LOVE to experience when I'm around other crafters. A few of the other ladies who own a Cricut and I were talking a bit and I mentioned (with much agreement from them) that I had a really hard time remembering when I selected my size if it was selecting the measurement from top to bottom or from left to right. One of the ladies, however, spoke up and said, "Well, it's top to bottom, isn't it?" And I said, "But how do you know? I keep meaning to write it down, but I never do." And she said (genius!), "Well, when you cut a 2" letter, it's 2" tall. So I think it's top to bottom." And NOW I'll never forget. And if anyone is just laughing at me for being so naive, that's okay. But if anyone else is with me on this and having an epiphany moment right now, I embarrassed myself just for you and it was worth it.
Okay, okay...
The thing I'm cutting right now is from the Storybook Cartridge. I'm cutting the swirlie twirlie border piece you get in the extras from the #2. If you look at the image, it's wider than it is tall. But I want it to go across a piece for a card. This is the kind of thing I'm talking about with figuring sizes--How do I know how tall to cut it when I don't know how wide it will end up being?
So, this is what I did...
 I set an 8.5x11" piece of paper in the bottom left hand corner. (8.5x11" is just what I had lying around... anything bigger than what I'm describing will work.)
I used my arrow keys and moved the blade to the left, to 7.5", then I moved it down to 6.25" and hit the "set paper size" button. It set the paper size as 4.5x5.75". Now, I know a standard card is 4.25x5.5", but you'll understand why I set it bigger in a sec.
Now that I've done this, I can hit the "fit to page" button. I'll select "Tall", then press "shift", and then press the "2" key. This will give me my swirlie twirlie border. Now, make sure (for your own future reference) that you're keeping a notebook right by you so that you can jot stuff down as you do this yourself, for whatever thing you're trying to cut to the size of your card or whatever, because when you hit "cut", you'll see the little screen says, "Calculating fit to page", then it shows you the size, which in this case is 2". It cuts the piece, fitting it to the 4.5x5.75" page size, which gives you a nearly perfect piece for the standard card which is slightly smaller because the Cricut NEVER cuts all the way to the edge of the page.
Now, keep in mind which edge you want your piece to align to (the 4.25" or 5.5" side). You may have to experiment a bit to find the right orientation for each project (you may need to have the blade go 6.25" left and 7.5" down instead, to get the card rectangle flipped). BUT, if you keep a notebook with you, like I said, you'll have the information for future attempts and will not need to go through all of this figuring again. AND... IT'S ONLY PAPER! You can recycle it if you mess up.
Below is the piece that the Cricut cut, which fit the card pretty nicely. Remember this is Tall, Shift, 2, set at 2". Now... this wasn't good enough for me at first. So I thought I'd try it at 2.25" just to see what I got, and see if it'd match better.

I put the paper back on my mat, but just let it be up in the corner, like you see below. I know that the piece I'm cutting isn't going to be too big for this paper, so I don't have to worry about aligning it in the bottom corner and setting the paper size. I'll just cut from here, the same image as above, at 2 1/4". (Make sure you turn "fit to page" OFF before doing something like this right after your last cut.)

Okay, it turned out too big! So the other one is the one I love. I'll use the extra for something else at some point. OR, it could also be put on a card, but have the extra hanging parts cut off. You just have to decide which you'd like better.

So I did those two things and figured I'd do one more thing on this paper. I aligned it in the bottom corner like I did at first and went over with my blade 7.5", then down 6.25", then set paper size to get my 4.5x5.75" piece of paper set in the Cricut. I chose a pretty branch corner piece. Once again, select fit to page, and then select your image. In this case, "fancy/corner", then "shift", then "Z". Again, before you press cut, get your notebook ready so you can remember the size once it pops up on the screen. I hit cut, then saw the size pop up as 4". Now I know that if I want to use this branch again, I need to cut it at 4" to fit well on a card.

Below is the picture of my branch. Pretty cool, huh? ^_^

Now, one of the things people talk about a lot is what to do with the leftover paper you have from cutting stuff on the Cricut. You can be uber savvy and save things for stenciling or something, but I've learned that if I save everything, I never use anything because I have too much crap piled around to find the stuff I want. Also, I've learned that as I file my scraps, it's really hard to file scraps that have all of these holes in them.

So, below you see I've cut the holey parts of the paper out. Anything reasonably large enough to use later for punched shapes or more cutting, I'll keep. Anything else, I recycle. I'll recycle the pieces with the holes and keep the strips, which are already in my plain black cardstock scrap file as we speak.

I figured I'd show the card I made with the branches here, too, since I messed with it a bit. I decided that I couldn't get just the right angle I wanted with the piece exactly as it was, so I cut it at the joining point and slightly angled the bottom piece.

Then I stuck a cutesy thing on top. The letters are cut from the Storybook cartridge, too, using the Fancy/Corner option. I also cut the little bird from the Storybook cartridge. I thought it looked so cute, looking behind itself like that, almost like it is all solitary, looking for another bird. I like to use that one a lot on cards for missing people.

Okay, so thar she be. More tips to come, I'm sure... If you found this particularly helpful, please leave a comment. And if you tell me I need to get the software, you can refer to my comment above. ^_~
Saturday, July 25, 2009
Cricut Storybook Cartridge Banner Project
I am so wickedly blessed to own a Cricut Expressions machine. The thing is nothing short of awesome. In case you were wondering if it was really any good or not--it so IS. (Good, I mean.)
They go on sale sometimes, and you should never even think of paying $500.00 for a brand new one online. I had a party at my house last night and we just sat around making paper crafts--it was SO fun, and one of the ladies there mentioned that she had gotten her Cricut Expressions on eBay for about $180.00. Still not chump change, but after saving up for a while, that's doable. And I DO recommend that if you were ever planning on getting a Cricut that you just save up your money to go for the big one, the Expressions machine, instead of the Personal trimmer, which is still cool, but doesn't cut as much as the Expressions (Personal trimmer uses 6x12 pieces of paper, and the Expressions can cut up to 12x24 papers.). And the Expressions has a few extra little machine features that I like, too.
Anyway, anyway. So, being the crafty person I am, one of the things I love the most (besides actually making things) is looking around at what other people have done and just soaking up their brilliance. I especially was excited to start looking around online for Cricut projects so that I could learn to use my machine. I was very disappointed, however, to find that there are almost no projects out there, and the ones that are seem to seriously be lacking in the information department as far as what buttons, what size, etc., and if I wanted to spend forever staring at a picture to figure a project out on the Cricut, I guess that's okay. But, being me, I tend to not do that, so... I figure things out on my own! (After all, as I've repeatedly told myself, it's only paper. And I DO recycle my waste.)
ALSO... my big beef with a lot of the projects out there is how many cartridges are used in creating them. I don't know about you, but I'm not going to buy a million cartridges just to make one project. So, I think I'm going to start featuring projects for a while using nothing but the Storybook Cartridge. That cartridge is SO full of cool stuff, it's definitely worth the money. Only, again, not the $100 you pay for it in a craft store (unless it's one of those rare times they're on sale for $39.99)--either hit Walmart and get it for $60.00, Amazon to get it for $54.00 or so, www.cricutmachine.com if they have a sale is usually pretty good, OR hit eBay and get one for $30.00 or so.
Okay, okay. So, here is the party banner I made for my party using the Storybook Cartridge:
Storybook Cartridge Banner Project
Supplies:
Storybook Cartridge
Cricut Machine (This one will work on the Personal Electronic Cutter OR the Expressions)
Color A Cardstock (Light Green on mine)
Color B Cardstock (Black on mine)
Color C Cardstock (Darkish Red on mine)
Silver Eyelets
Black Ribbon
1. Using color A, cut six 5.5" scalloped squares. (Load paper. Push Accent Blackout, shift, C.)
2. Using color B, cut six 4.5" square swirlie background pieces (Load paper. Push Accent Frame, shift, 7.)
3. Using color B, cut 4" shadow characters for banner (P, A, R, T, Y, !). (Load paper. Push Shadow, [character].)
4. Using color C, cut 4" normal characters for banner (P, A, R, T, Y, !). (Load paper. Type in characters, making sure that "shadow" is turned off. Cut.)
5. Assemble as shown in pictures. Glue swirlie background to scalloped square. Center shadow letter over background, adhere. Center normal letter over shadow letter, adhere. Set 3/16" eyelets in the top two corners of banner. Tie all pieces together with ribbons, making loops out of the very end pieces of ribbons, to hang on the wall.
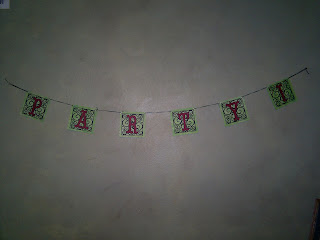
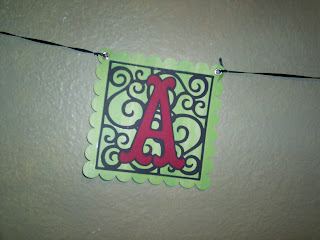
If I was super smart, I would have made it in different colors. (It's green on a green wall, which made it not stand out too much. But, oh, well.) I love the fact that this doesn't look like Christmas even though it IS red and green. I know that surrounded with Christmas stuff, however, it WOULD manage to look Christmas-y, so I'm definitely saving it for when I have a holiday party, which I'm sure I will, because I LOVE having parties.
So hopefully this was a helpful project idea. Like I said, I'm going to start posting more projects using this one cartridge. I'll do it until I get sick of it, but the thing is so absolutely brimming with glorious images, I think it will take a LONG time to ever use it all.
Saturday, July 18, 2009
6x6" mini album project plus examples
I recently posted a text only instruction set for this album in the http://scrapbooking.about.com forum (SUCH a cool thing, check it out! [look at the guide's picture, and right underneath her name it says, "my forum", which is where you go to set up an account and join), but in that piece, I made it simpler because I didn't have pictures to back up what I'm going to be talking about here.
So here is the REAL 6x6" mini album as I make it. It seems complex at first, but is really quite easy once you know all of the pieces.
Kathy's 6x6 Mini Album:
Supplies:
If using double sided cardstock: 2 12x12 sheets
If using single sided cardstock: 4 12x12 sheets
Glue (I love Scotch QuickDry Adhesive)
Ribbon, 18-24" (I don't ever go bigger than 1/4" thick)
Stamping inks, if you want to ink edges
Tools:
Slide Cutter/Paper Trimmer
Bone Folder
Paper piercer (something to poke holes in the paper, the ends of very sharp scissors work, too)
Tapestry Needles (For sewing ribbon through holes. Mine are DMC size 22.)
Instructions
(My pictures show the steps to make the album with single-sided cardstock because it's more complex.)
1. Choose which of your papers you would like to be your cover.
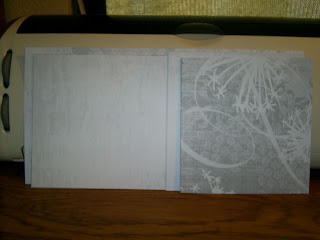
These are the pieces that you'll cut to make your album:
For double sided cardstock, cut only A and B pieces. For single sided cardstock, cut all. Choose your own colors for the inside pages. After choosing the cover, I usually just let mine be random.
A: 6x12 (1) (This is the cover piece)
A1: 6x5.75 (2) (These are the two pieces you'll cut to glue inside the cover if you're using single sided cardstock.)
B: 5.75x11.5 (3) (These are the pages of the album.)
B1: 5.75x5.5 (6) (These are the pieces you'll cut to glue inside the album where the single sided cardstock leaves white pages.)
The picture below shows all of the pieces cut and ready to work with.
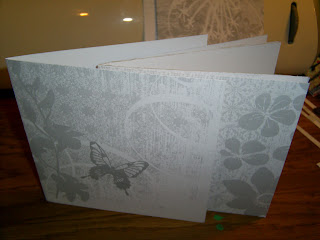
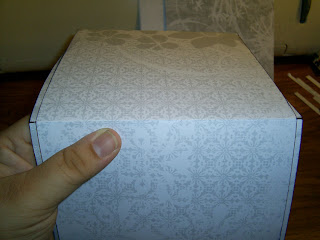
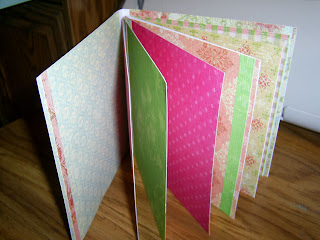
2. Take piece A and the three B pieces and fold them in half, with the white side inside (or the secondary design inside, if using double sided cardstock), as shown in the picture below. They will sandwich together and form the album, as shown.
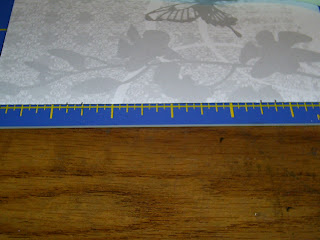
3. Leaving piece A folded, measure 1 1/4" down from each end on the fold and make a small mark. You may prefer the look of a slightly smaller tie on the outside, in which case you can measure 1 1/2" in from each edge. My example below shows both measurements marked. I typically do 1 1/4".
4. Using your piercing tool, poke a hole through the paper at the fold, one through each mark.
5. I started inking the edges of my papers here so that they'd be easier to see (but it also looks cooler, I think. ^_~) Center a single B piece over the OUTSIDE of the cover, as shown below.
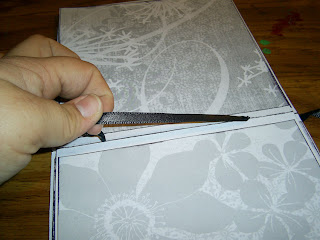
6. Because the cover is on the inside of the page, you can see the holes from the inside. So, keeping everything centered on the outside, and using the holes already punched in the cover as your guide, pierce the page as shown below once through each hole.
7. Set the cover (piece A) aside. One at a time, complete step 6 with each of the other two page pieces (2 B pieces), only instead of centering, just align them as shown in the photo below and pierce the holes, using the holes in the first pierced page as your guide.
8. Once all three of the pages are pierced, check to make sure all of the holes were aligned by stacking it all together and piercing through the holes. They should be perfect if you actually did things one page at a time like I said, but you should still check.
9. At this point, if you want to start getting fancy and inking all of your edges, as well as the outer and inner seams of the pages, have at it. The middle is going to show as the pages are turned in the finished album, and, like I usually tell my students at JoAnn: it's these little details that take your project from "handmade" to "handcrafted".
10. Take your cover (piece A) and set the A1 pieces on either side, making sure you have the right length facing the right way (you should have the piece covering the entire cover from top to bottom [unless your cutter misbehaves like mine did and you end up with slight shortages] and there should be a 1/4" space between the fold in the middle of the cover and the beginning of your A1 piece, as shown below. I always tell my students to do a "dry run" before gluing pieces like this. For instance, I did cut these slightly too short, but I was able to see that and figure out where I had to glue it to make it look good BEFORE the thing was covered in adhesive and very difficult to move around. It's worth it to check.
11. Glue the inner cover pieces (A1 pieces) to the cover as shown below. If you did your dry run, you shouldn't have had very many problems, if any at all. Set this piece aside.
12: Take the rest of your book pieces and assemble them the way you want them to be BEFORE gluing them. This entire step is a dry run! Sandwich the pages (3 B pieces) however you want them to go. Insert your B1 pieces every place there's a white spot, like you see at my left hand page below. Make sure, again, that you're lining up the correct height and width. There should be a 1/4" space between the fold in the middle of the page and the part you just glued in. Also, I'll say that I think we scrappers waste too much time on steps like these. Seriously, if you picked well coordinated papers, this step can be completely random and it will still look great. You may want to ensure that you always have a different paper another, or you may decide to do a 2 page layout in here somewhere and you want the two papers the same. Either way, just get it done. Don't agonize over it!
13. Go through the book now and begin gluing the pages. I tend to find it easiest to just do it with the album semi-assembled like in my picture below. I go through, flipping pages, and gluing the loose ones down wherever required. This step is super fun! The book is starting to look like something!
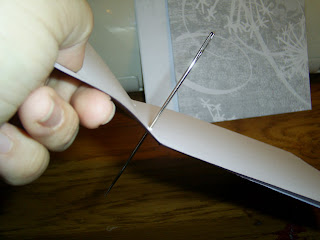
14. TIME TO SEW!!!!! Put your cover over your inner pages. Thread your piece of ribbon (18" usually works well, unless you want a big, flashy, droopy thing, then go with 24") onto your tapestry needle and thread it through all of the pages, starting from the OUTSIDE of the book, like the picture shows.
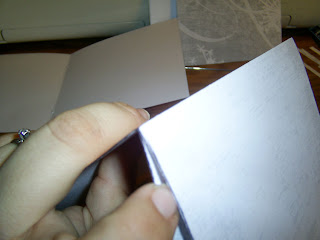
15. Leaving a long tail on the outside of the book, go through the other hole, to the outside cover, as shown below.

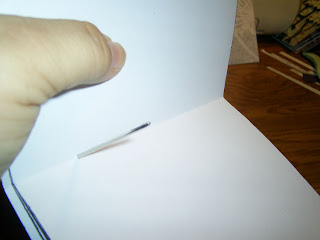
16. Pull the ribbon snug against the inside of the book and unthread your tapestry needle. Even out the ends of the ribbon. Look inside and see if your ribbon got all twisty (it probably did). If so, Pull the ribbon up from one end slightly and smooth the ribbon on the inside to at least as long as the space between your holes. Look at the picture below.
17. Still holding onto the ribbon at that spot, pull the tail on the outside of the book until you have to let go. Your ribbon should be nice and straight again.

18. Tie it all up! On the outside, I usually tie a square knot and then a double-knotted bow. You could tie a little less securely if you want to add a page later, or if you mess up and decide you need to remove a page, or whatever. But I usually just tie it all up because I'm not sure what I'm going to do with it yet. Like this one... I have no idea. But I like the grays a lot!
Tips:
-Using double sided cardstock makes the entire process faster, but not as sturdy. In the method used above, you get two layers of cardstock per page instead of just one. It's still not that big of a deal, but it's something to consider before you make your project.
-Using actual glue (such as Scotch QuickDry Adhesive, which I LOVE... did you know that yet??? If not, you haven't been reading my blog until now, have you!?) instead of a tape runner seems to end up making the whole thing less bendy when you're done. I guess the glue dries harder than a tape runner. Also, it holds together better over the long run. Using only a minimal amount of glue greatly diminishes the possibility that you'll end up with puckers in your finished piece. Seriously, it doesn't take much!
-I do special cutting on these because I like for everything to be contained inside of the cover. You could decrease the time it takes to make this project simply by making it up of 6x12 pieces of paper. The finished product never looks quite as nice, but if you're in a hurry, it works.
Here are a couple of other finished examples I've made:
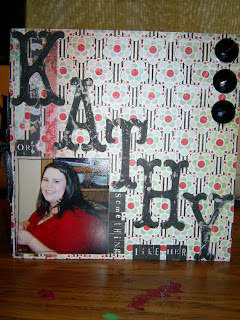
This one is going to be a chronicle of my weight loss. I purposely used a photo of myself at my max weight where I was dressed up, smiling, and happily doing crafts. I entitled the album, "Kathy or Something Like Her" kind of as a statement of this cover photo not showing the real me, specifically as our modern culture views overweight people. No matter how much thinner I am now or how much thinner I ever will get, I will never be more "me" than I was at that point (dressed up all girlie and doing crafts!), but everyone seems to view me differently. Anyway, I know people are trying to be nice when they congratulate me on my progress, but on some level it feels insulting, as if losing weight is progress of my person rather than progress of breaking bad, unhealthy habits. I mean, I'm no more worthwhile as a person now than I was then, and no matter how thin I get, I will never be worth more than I was at that moment. I will always be worth exactly the same. It'll just look a little different. I don't know all of that makes sense, and it's probably a bit too personal for this post, but here it is.
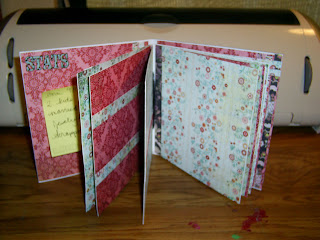
This is the inside of this album. I'm not sure quite yet what's going on all the pages, but while I'm still in the planning stages, I'm sticking post-it notes with notes on the inside. I know that the second page is going to be a before and after kind of thing. The rest of it is going to include a lot of my reflections on this entire stupid process. ROFL... Okay, I guess I got myself in a mood by talking a bit up there about this whole thing. But this one is too personal to NOT explain. ^_^
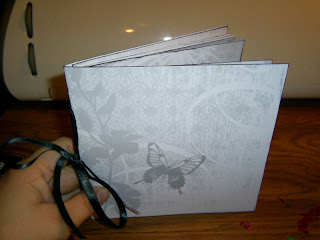
Here is one other album I did, completely blank, and not at all decorated yet. I think I might turn this one into a present album for pictures of my friend's little girl. I don't have girls of my own and I really need to use all the pink, girlie stuff I have on SOMEONE besides myself! ^_~
So here is the REAL 6x6" mini album as I make it. It seems complex at first, but is really quite easy once you know all of the pieces.
Kathy's 6x6 Mini Album:
Supplies:
If using double sided cardstock: 2 12x12 sheets
If using single sided cardstock: 4 12x12 sheets
Glue (I love Scotch QuickDry Adhesive)
Ribbon, 18-24" (I don't ever go bigger than 1/4" thick)
Stamping inks, if you want to ink edges
Tools:
Slide Cutter/Paper Trimmer
Bone Folder
Paper piercer (something to poke holes in the paper, the ends of very sharp scissors work, too)
Tapestry Needles (For sewing ribbon through holes. Mine are DMC size 22.)
Instructions
(My pictures show the steps to make the album with single-sided cardstock because it's more complex.)
1. Choose which of your papers you would like to be your cover.
These are the pieces that you'll cut to make your album:
For double sided cardstock, cut only A and B pieces. For single sided cardstock, cut all. Choose your own colors for the inside pages. After choosing the cover, I usually just let mine be random.
A: 6x12 (1) (This is the cover piece)
A1: 6x5.75 (2) (These are the two pieces you'll cut to glue inside the cover if you're using single sided cardstock.)
B: 5.75x11.5 (3) (These are the pages of the album.)
B1: 5.75x5.5 (6) (These are the pieces you'll cut to glue inside the album where the single sided cardstock leaves white pages.)
The picture below shows all of the pieces cut and ready to work with.

2. Take piece A and the three B pieces and fold them in half, with the white side inside (or the secondary design inside, if using double sided cardstock), as shown in the picture below. They will sandwich together and form the album, as shown.

3. Leaving piece A folded, measure 1 1/4" down from each end on the fold and make a small mark. You may prefer the look of a slightly smaller tie on the outside, in which case you can measure 1 1/2" in from each edge. My example below shows both measurements marked. I typically do 1 1/4".
4. Using your piercing tool, poke a hole through the paper at the fold, one through each mark.

5. I started inking the edges of my papers here so that they'd be easier to see (but it also looks cooler, I think. ^_~) Center a single B piece over the OUTSIDE of the cover, as shown below.

6. Because the cover is on the inside of the page, you can see the holes from the inside. So, keeping everything centered on the outside, and using the holes already punched in the cover as your guide, pierce the page as shown below once through each hole.

7. Set the cover (piece A) aside. One at a time, complete step 6 with each of the other two page pieces (2 B pieces), only instead of centering, just align them as shown in the photo below and pierce the holes, using the holes in the first pierced page as your guide.

8. Once all three of the pages are pierced, check to make sure all of the holes were aligned by stacking it all together and piercing through the holes. They should be perfect if you actually did things one page at a time like I said, but you should still check.

9. At this point, if you want to start getting fancy and inking all of your edges, as well as the outer and inner seams of the pages, have at it. The middle is going to show as the pages are turned in the finished album, and, like I usually tell my students at JoAnn: it's these little details that take your project from "handmade" to "handcrafted".

10. Take your cover (piece A) and set the A1 pieces on either side, making sure you have the right length facing the right way (you should have the piece covering the entire cover from top to bottom [unless your cutter misbehaves like mine did and you end up with slight shortages] and there should be a 1/4" space between the fold in the middle of the cover and the beginning of your A1 piece, as shown below. I always tell my students to do a "dry run" before gluing pieces like this. For instance, I did cut these slightly too short, but I was able to see that and figure out where I had to glue it to make it look good BEFORE the thing was covered in adhesive and very difficult to move around. It's worth it to check.
11. Glue the inner cover pieces (A1 pieces) to the cover as shown below. If you did your dry run, you shouldn't have had very many problems, if any at all. Set this piece aside.

12: Take the rest of your book pieces and assemble them the way you want them to be BEFORE gluing them. This entire step is a dry run! Sandwich the pages (3 B pieces) however you want them to go. Insert your B1 pieces every place there's a white spot, like you see at my left hand page below. Make sure, again, that you're lining up the correct height and width. There should be a 1/4" space between the fold in the middle of the page and the part you just glued in. Also, I'll say that I think we scrappers waste too much time on steps like these. Seriously, if you picked well coordinated papers, this step can be completely random and it will still look great. You may want to ensure that you always have a different paper another, or you may decide to do a 2 page layout in here somewhere and you want the two papers the same. Either way, just get it done. Don't agonize over it!
13. Go through the book now and begin gluing the pages. I tend to find it easiest to just do it with the album semi-assembled like in my picture below. I go through, flipping pages, and gluing the loose ones down wherever required. This step is super fun! The book is starting to look like something!

14. TIME TO SEW!!!!! Put your cover over your inner pages. Thread your piece of ribbon (18" usually works well, unless you want a big, flashy, droopy thing, then go with 24") onto your tapestry needle and thread it through all of the pages, starting from the OUTSIDE of the book, like the picture shows.

15. Leaving a long tail on the outside of the book, go through the other hole, to the outside cover, as shown below.

16. Pull the ribbon snug against the inside of the book and unthread your tapestry needle. Even out the ends of the ribbon. Look inside and see if your ribbon got all twisty (it probably did). If so, Pull the ribbon up from one end slightly and smooth the ribbon on the inside to at least as long as the space between your holes. Look at the picture below.

17. Still holding onto the ribbon at that spot, pull the tail on the outside of the book until you have to let go. Your ribbon should be nice and straight again.

18. Tie it all up! On the outside, I usually tie a square knot and then a double-knotted bow. You could tie a little less securely if you want to add a page later, or if you mess up and decide you need to remove a page, or whatever. But I usually just tie it all up because I'm not sure what I'm going to do with it yet. Like this one... I have no idea. But I like the grays a lot!

Tips:
-Using double sided cardstock makes the entire process faster, but not as sturdy. In the method used above, you get two layers of cardstock per page instead of just one. It's still not that big of a deal, but it's something to consider before you make your project.
-Using actual glue (such as Scotch QuickDry Adhesive, which I LOVE... did you know that yet??? If not, you haven't been reading my blog until now, have you!?) instead of a tape runner seems to end up making the whole thing less bendy when you're done. I guess the glue dries harder than a tape runner. Also, it holds together better over the long run. Using only a minimal amount of glue greatly diminishes the possibility that you'll end up with puckers in your finished piece. Seriously, it doesn't take much!
-I do special cutting on these because I like for everything to be contained inside of the cover. You could decrease the time it takes to make this project simply by making it up of 6x12 pieces of paper. The finished product never looks quite as nice, but if you're in a hurry, it works.
Here are a couple of other finished examples I've made:
This one is going to be a chronicle of my weight loss. I purposely used a photo of myself at my max weight where I was dressed up, smiling, and happily doing crafts. I entitled the album, "Kathy or Something Like Her" kind of as a statement of this cover photo not showing the real me, specifically as our modern culture views overweight people. No matter how much thinner I am now or how much thinner I ever will get, I will never be more "me" than I was at that point (dressed up all girlie and doing crafts!), but everyone seems to view me differently. Anyway, I know people are trying to be nice when they congratulate me on my progress, but on some level it feels insulting, as if losing weight is progress of my person rather than progress of breaking bad, unhealthy habits. I mean, I'm no more worthwhile as a person now than I was then, and no matter how thin I get, I will never be worth more than I was at that moment. I will always be worth exactly the same. It'll just look a little different. I don't know all of that makes sense, and it's probably a bit too personal for this post, but here it is.

This is the inside of this album. I'm not sure quite yet what's going on all the pages, but while I'm still in the planning stages, I'm sticking post-it notes with notes on the inside. I know that the second page is going to be a before and after kind of thing. The rest of it is going to include a lot of my reflections on this entire stupid process. ROFL... Okay, I guess I got myself in a mood by talking a bit up there about this whole thing. But this one is too personal to NOT explain. ^_^

Here is one other album I did, completely blank, and not at all decorated yet. I think I might turn this one into a present album for pictures of my friend's little girl. I don't have girls of my own and I really need to use all the pink, girlie stuff I have on SOMEONE besides myself! ^_~


Wednesday, July 15, 2009
Mini Album Project/Scrap Storage Solution
Starting in September, I'm teaching a really cute mini album class at the Riverview JoAnn. Those projects, unlike this one, are made of nothing but cardstock (except for a couple of hardware pieces: eyelets, binder rings, and ribbon on a few of the projects). This one uses two plastic cards as the base of the covers. I'll go through showing you how to use these kinds of things in your own projects!
Gift Card Mini Album a la Kathy
Materials:
-2 credit card sized plastic cards that you can get rid of (I'm using an old DQ card and an old insurance card... just make sure you're not using a real credit card or any other kind of card with raised numbers on it. Your cards need to be totally flat.)
-Good glue, such as Scotch Quick Dry Adhesive (which I LOVE because it dries so fast!)
-Papers or cardstock for covering the cards
-Cardstock for inner pages
-Binder rings
Tools:
-Sanding block (mine is fine grit, picked up at JoAnn)
-Cropodile Punch and Eyelet setter (necessary for punching holes in the cards)
-Bone folder or BasicGrey rubon tool (optional)
-Ticket Corner punch (optional)
-Scissors
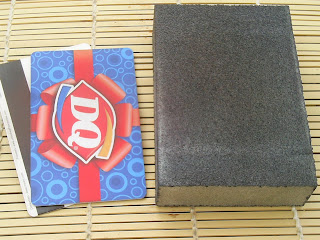
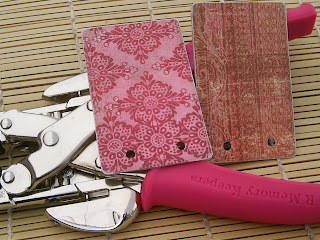
1. Start off by sanding your cards until they're no longer shiny, and you can see some of the sanding scratches on the surface.
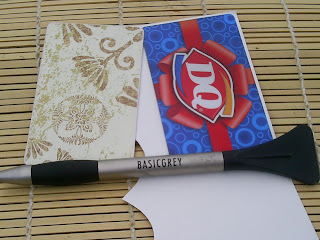
2. Once sanded, your cards are ready to receive glue and paper! Put a bit of glue all over the surface of the card, but not TOO close to the edges. With your chosen paper wrong side up, press the card into the paper. If you don't want to burnish the card, then just push pretty hard and it should be good. To ensure a great connection, though, flip the card and attached paper over (before cutting!) and rub on the paper (looking at the front of the paper now) with the rubon tool (using the black paddle at the end) or a bone folder. This ensures that glue gets between the card and the paper well, and eliminates possible air bubbles (which aren't likely to form if you're pressing the card with glue onto the back of the paper on a flat surface, like I said before). Be advised, however, that you'll end up squooshing (the technical term) glue from the sides of the card by burnishing it. Just flip it back over and use your fingernails to scoop excess glue from the edges of the card. Let it dry.
3. Cut with the scissors as close to the edge of the card as you can without cutting the actual card, then sand only the edges of the paper so that they're even with the card. With the paper facing you, sand only down around the edges of the card, paying attention to the corner, too.
(Picture shows step 2 in progress [the DQ card] and step 3 already finished [the tan flowery paper on the left]) Once one side of the card is finished, repeat steps 2 and 3 on the other side of the card.
4. Decide where you want your hole(s) and make marks on one card with your desired front paper facing you. Using the Cropodile, center the mark in the 3/16" hole puncher and punch through the card. Decide which side of the other card you want to be the back of your album. Face that side towards the back and hold the two cards together, the front cover with the holes facing towards you, and the back cover without holes facing away. Sandwich both of the pieces into the cropodile, centering the previously punched holes in the 3/16" hole puncher, and punch the holes into the back card piece.
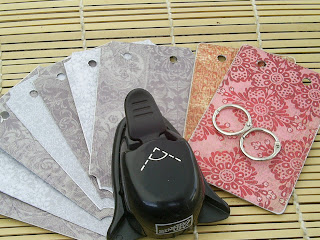
5. Cut pieces of cardstock for your pages (these cards measure 2 1/8" by 3 3/8"). I like to make two pieces of cardstock per "page" in the album. I've made seven pages for this album, so I cut fourteen pieces of cardstock. Before gluing their wrong sides together, I used my ticket corner punch to punch the corners of the pages. This ensures that their corners aren't sticking out of the edge of the album. Alternatively, you could cut each individual piece against one of the covers and get rid of the extra corners. I'm too impatient for that, so I just used my corner punch. I'd use the cover to cut the corners with my scissors if I was using only 1 ring and setting it in the corner.
6. Once you get the pieces cut and glued together, get your pages arranged in the order you want them in. Sandwich up to four of these pages (remember, two cardstock pieces per page, so you're actually cutting through 8 layers of cardstock--like butter! [oh, I LOVE my cropodile!]) behind the front cover and center the holes in the 3/16" hold puncher. Punch the cardstock holes. Take your remaining pages and do the same, so that all of your pages are punched and the album is ready to be assembled.
7. Using the binder clips, put your album together! Keep the front cover facing the front and the back cover facing the back.
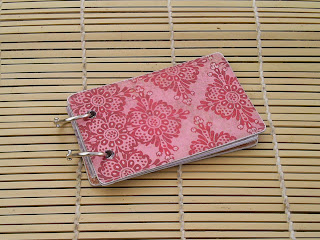
Here's a shot of the album open. Isn't all pretty inside with those cute, muted papers and the corners punched out?
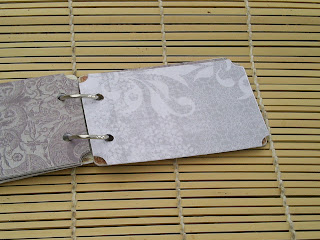
Now, you could ink edges or do any other number of decorative stuff to these albums. They are TOO cute. They fit 2x2" cropped pictures very nicely, and you could include some kind of sentiment or saying or whatever. Just keep in mind that when choosing your embellishments, keep them relatively thin and also remember that you can't really poke a brad through one of these pages (it'd stick out on the other side). If you do decide to do that, you have to design something on the other side of the page to cover your ends up. I have NOT found that it's okay to do brads or whatever before gluing the pages together. The extra bulk between the cardstock pieces distorts the final page every time.
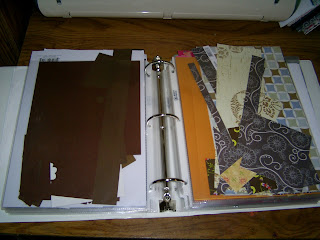
STORING SCRAPS!
Okay, now here's a shot of my big binder of scraps. I love this thing! Since I started using it, I'm almost never cutting up new pieces of paper. In fact, the entire mini album I just made was made completely from scrap pieces in my scrap binder.
This is an awesome way to use what you have and stop being so wasteful, both in an environmental and a financial sense. I know that if you don't have a scrap storage system, you're probably like I used to be--with huge amounts of space in your area devoted to scraps, but they never seem to get used because it's almost impossible to sift through them all!
I use a 2" binder filled with 8.5x11" page protectors. I store solid colors in one protector, then directly behind it I store patterned papers or cardstocks that are primarily the color of the solid papers directly in front of it. For instance, in this picture you can see my brown section. I've got solid colors of brown on the left and papers that are primarily brown, or make me think primarily of brown (such as the large piece that is mostly blue and green, but all I see are the brown squares, so it goes in the patterned brown paper sleeve) on the right. You can see the beginning of my orange section directly behind the brown patterned paper section.
This way, when I go to do a project, I look first through all of my scraps and pick out pieces that will work. I am saving SO much money this way! And I know I'm doing something good for the environment. If it can help anyone else with their own paper issues, I'd be happy to hear about it! ^_^
Gift Card Mini Album a la Kathy
Materials:
-2 credit card sized plastic cards that you can get rid of (I'm using an old DQ card and an old insurance card... just make sure you're not using a real credit card or any other kind of card with raised numbers on it. Your cards need to be totally flat.)
-Good glue, such as Scotch Quick Dry Adhesive (which I LOVE because it dries so fast!)
-Papers or cardstock for covering the cards
-Cardstock for inner pages
-Binder rings
Tools:
-Sanding block (mine is fine grit, picked up at JoAnn)
-Cropodile Punch and Eyelet setter (necessary for punching holes in the cards)
-Bone folder or BasicGrey rubon tool (optional)
-Ticket Corner punch (optional)
-Scissors
1. Start off by sanding your cards until they're no longer shiny, and you can see some of the sanding scratches on the surface.

2. Once sanded, your cards are ready to receive glue and paper! Put a bit of glue all over the surface of the card, but not TOO close to the edges. With your chosen paper wrong side up, press the card into the paper. If you don't want to burnish the card, then just push pretty hard and it should be good. To ensure a great connection, though, flip the card and attached paper over (before cutting!) and rub on the paper (looking at the front of the paper now) with the rubon tool (using the black paddle at the end) or a bone folder. This ensures that glue gets between the card and the paper well, and eliminates possible air bubbles (which aren't likely to form if you're pressing the card with glue onto the back of the paper on a flat surface, like I said before). Be advised, however, that you'll end up squooshing (the technical term) glue from the sides of the card by burnishing it. Just flip it back over and use your fingernails to scoop excess glue from the edges of the card. Let it dry.
3. Cut with the scissors as close to the edge of the card as you can without cutting the actual card, then sand only the edges of the paper so that they're even with the card. With the paper facing you, sand only down around the edges of the card, paying attention to the corner, too.
(Picture shows step 2 in progress [the DQ card] and step 3 already finished [the tan flowery paper on the left]) Once one side of the card is finished, repeat steps 2 and 3 on the other side of the card.

4. Decide where you want your hole(s) and make marks on one card with your desired front paper facing you. Using the Cropodile, center the mark in the 3/16" hole puncher and punch through the card. Decide which side of the other card you want to be the back of your album. Face that side towards the back and hold the two cards together, the front cover with the holes facing towards you, and the back cover without holes facing away. Sandwich both of the pieces into the cropodile, centering the previously punched holes in the 3/16" hole puncher, and punch the holes into the back card piece.

5. Cut pieces of cardstock for your pages (these cards measure 2 1/8" by 3 3/8"). I like to make two pieces of cardstock per "page" in the album. I've made seven pages for this album, so I cut fourteen pieces of cardstock. Before gluing their wrong sides together, I used my ticket corner punch to punch the corners of the pages. This ensures that their corners aren't sticking out of the edge of the album. Alternatively, you could cut each individual piece against one of the covers and get rid of the extra corners. I'm too impatient for that, so I just used my corner punch. I'd use the cover to cut the corners with my scissors if I was using only 1 ring and setting it in the corner.
6. Once you get the pieces cut and glued together, get your pages arranged in the order you want them in. Sandwich up to four of these pages (remember, two cardstock pieces per page, so you're actually cutting through 8 layers of cardstock--like butter! [oh, I LOVE my cropodile!]) behind the front cover and center the holes in the 3/16" hold puncher. Punch the cardstock holes. Take your remaining pages and do the same, so that all of your pages are punched and the album is ready to be assembled.

7. Using the binder clips, put your album together! Keep the front cover facing the front and the back cover facing the back.

Here's a shot of the album open. Isn't all pretty inside with those cute, muted papers and the corners punched out?

Now, you could ink edges or do any other number of decorative stuff to these albums. They are TOO cute. They fit 2x2" cropped pictures very nicely, and you could include some kind of sentiment or saying or whatever. Just keep in mind that when choosing your embellishments, keep them relatively thin and also remember that you can't really poke a brad through one of these pages (it'd stick out on the other side). If you do decide to do that, you have to design something on the other side of the page to cover your ends up. I have NOT found that it's okay to do brads or whatever before gluing the pages together. The extra bulk between the cardstock pieces distorts the final page every time.
STORING SCRAPS!
Okay, now here's a shot of my big binder of scraps. I love this thing! Since I started using it, I'm almost never cutting up new pieces of paper. In fact, the entire mini album I just made was made completely from scrap pieces in my scrap binder.
This is an awesome way to use what you have and stop being so wasteful, both in an environmental and a financial sense. I know that if you don't have a scrap storage system, you're probably like I used to be--with huge amounts of space in your area devoted to scraps, but they never seem to get used because it's almost impossible to sift through them all!
I use a 2" binder filled with 8.5x11" page protectors. I store solid colors in one protector, then directly behind it I store patterned papers or cardstocks that are primarily the color of the solid papers directly in front of it. For instance, in this picture you can see my brown section. I've got solid colors of brown on the left and papers that are primarily brown, or make me think primarily of brown (such as the large piece that is mostly blue and green, but all I see are the brown squares, so it goes in the patterned brown paper sleeve) on the right. You can see the beginning of my orange section directly behind the brown patterned paper section.
This way, when I go to do a project, I look first through all of my scraps and pick out pieces that will work. I am saving SO much money this way! And I know I'm doing something good for the environment. If it can help anyone else with their own paper issues, I'd be happy to hear about it! ^_^

Friday, July 10, 2009
Making your own digital chipboard/letters for digital scrapbooking
So here is what I figured out how to do today while I didn't have enough time to get everything done that I had to get done. Well, if anyone benefits from this, I'll consider it worth it.
I used my Adobe Photoshop Elements 2.0, so if you have anything higher than that, you should be able to do this, too. I did some screen prints so that you could see exactly what I was clicking on in a couple of these shots.
First thing to do is grab a scrap of cool patterned paper that you have lying around. Either use that plain or rough it up like I did. Just crumple it several times, even sanding a bit on top of the crumpled pieces to get extra wear and tear, and you'll get a cool texture to work with in the program.
Scan the paper into your computer at 300 dpi or ppi and open the image up in Adobe Photoshop Elements (from now on I'm calling it APE... lol... that spells ape! Why do I find these things funny?). If you don't know how to do that, consult your scanner instructions or, if you're lazy like me, google "How to scan at 300 dpi with ..." and insert whatever the name of your scanner is. You should pop some instructions up.
Now, to create a letter, and using your little toolbar (either off to the side, like mine is, or up top if yours has merged with the top), click on the type tool. Specifically, click the "horizontal type mask tool" option on the little drop down menu that pops out, as the screen print below shows.
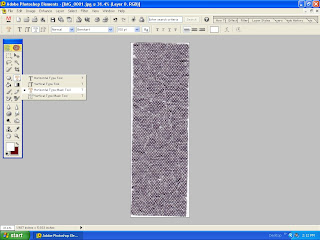
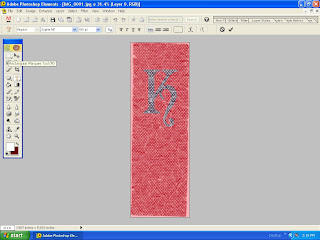
Once you've done that, you can choose your font and size (I chose 150 pt. Sophie MF... type 150 into the area where it shows the size option or whatever size you want if you don't see it on the drop down menu). Click at some point on your image and type the letter. It turns all weird and red, like the screen print shows below in my APE program.
Once that's done, go over and click on the Marquee Tool. That should make the red background disappear and let you see the letter shape selected. Once you see those little blinkie lines traveling around the shape of the letter, you can go up to Edit and click "copy", then over to File and click "New from clipboard".
You should open up a separate image that shows only your letter, but it's all cool and textured and looks very unlike a plain ol' letter. (Sorry to not have screen prints of all the junk I just said, but for whatever reason, the compy wasn't letting me do it, or I was probably doing it wrong.)
So just repeat the steps for another letter. Or, if you were smarter than me (which you probably are, especially if you know that technically, gramatically speaking, I mean, I should have said, "If you were smarter than I," instead) you could use a much larger scrap of paper than I did and type out an entire alphabet this way. Copy the entire thing, then open a new document. From here, you'll use the rectangular marquee tool and copy each individual letter, then open a new document, and save the letter as a separate file. Or you could just save the entire alphabet all typed in one layer and as you scrapbook, just copy and paste each individual letter you need to the document.
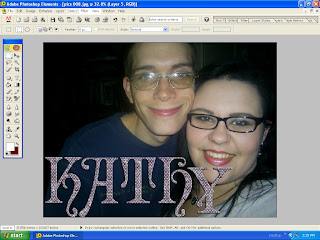
Here's a silly example I did, using a pic of me and my hubby from Valentine's Day this year. I put my name. Using the layer styles options (over in the tabs at the upper right hand corner of the screen), I went into the "bevel" options and chose "simple out" to make these look all 3D. I then went through the "drop shadow" options and chose "soft edge" to make it look even better. All of this work barely showed up on the dark background, but I think they still look pretty cool.
So maybe next time you go to buy a digital alphabet somewhere, you'll remember about this tutorial and be able to make some of your own. Hope it was helpful!
Oh, and I'm typing this pretty late at night after teaching a class at JoAnn and I'm not entirely clear right now, so if I left some gaping hole in the instructions, please let me know and I'll fix it post haste!
I used my Adobe Photoshop Elements 2.0, so if you have anything higher than that, you should be able to do this, too. I did some screen prints so that you could see exactly what I was clicking on in a couple of these shots.
First thing to do is grab a scrap of cool patterned paper that you have lying around. Either use that plain or rough it up like I did. Just crumple it several times, even sanding a bit on top of the crumpled pieces to get extra wear and tear, and you'll get a cool texture to work with in the program.
Scan the paper into your computer at 300 dpi or ppi and open the image up in Adobe Photoshop Elements (from now on I'm calling it APE... lol... that spells ape! Why do I find these things funny?). If you don't know how to do that, consult your scanner instructions or, if you're lazy like me, google "How to scan at 300 dpi with ..." and insert whatever the name of your scanner is. You should pop some instructions up.
Now, to create a letter, and using your little toolbar (either off to the side, like mine is, or up top if yours has merged with the top), click on the type tool. Specifically, click the "horizontal type mask tool" option on the little drop down menu that pops out, as the screen print below shows.

Once you've done that, you can choose your font and size (I chose 150 pt. Sophie MF... type 150 into the area where it shows the size option or whatever size you want if you don't see it on the drop down menu). Click at some point on your image and type the letter. It turns all weird and red, like the screen print shows below in my APE program.
Once that's done, go over and click on the Marquee Tool. That should make the red background disappear and let you see the letter shape selected. Once you see those little blinkie lines traveling around the shape of the letter, you can go up to Edit and click "copy", then over to File and click "New from clipboard".
You should open up a separate image that shows only your letter, but it's all cool and textured and looks very unlike a plain ol' letter. (Sorry to not have screen prints of all the junk I just said, but for whatever reason, the compy wasn't letting me do it, or I was probably doing it wrong.)

So just repeat the steps for another letter. Or, if you were smarter than me (which you probably are, especially if you know that technically, gramatically speaking, I mean, I should have said, "If you were smarter than I," instead) you could use a much larger scrap of paper than I did and type out an entire alphabet this way. Copy the entire thing, then open a new document. From here, you'll use the rectangular marquee tool and copy each individual letter, then open a new document, and save the letter as a separate file. Or you could just save the entire alphabet all typed in one layer and as you scrapbook, just copy and paste each individual letter you need to the document.
Here's a silly example I did, using a pic of me and my hubby from Valentine's Day this year. I put my name. Using the layer styles options (over in the tabs at the upper right hand corner of the screen), I went into the "bevel" options and chose "simple out" to make these look all 3D. I then went through the "drop shadow" options and chose "soft edge" to make it look even better. All of this work barely showed up on the dark background, but I think they still look pretty cool.

So maybe next time you go to buy a digital alphabet somewhere, you'll remember about this tutorial and be able to make some of your own. Hope it was helpful!
Oh, and I'm typing this pretty late at night after teaching a class at JoAnn and I'm not entirely clear right now, so if I left some gaping hole in the instructions, please let me know and I'll fix it post haste!
Subscribe to:
Posts (Atom)
