Friday, August 28, 2009

Storage Solution/Party Bag Show off and project!

Recently while wand'ring aimlessly through the aisles of my local JoAnn (which I do quite often because I teach there and like to wander and find new stuff), I came across these little beauties in the jewelry section:

As far as I remember, these things are usually $6.99 (but were 40% off when I bought them!). There are 30 tiny little vials which are PERFECT for storing small items such as brads, buttons, eyelets, clips, jewels, etc... I just absolutely love them. They make storing all of this stuff quite compact, too.
Also, I bought a different storage set with 12 large vials inside which I was using at first to store larger embellishments. I still have it, but also got another one because I realized that they were about the same size as my embossing powder jars which I was having trouble storing in my space. I emptied the embossing powder into those larger jars and now have a nice, compact, portable way of carting them all around (which is probably more important for me as a teacher than it would be for you if you're a stationary paper crafter, but I still felt it was cool enough to share!).

Also... I know that a little while ago I promised a series on projects you could do with the Storybook Cartridge on the Cricut. However, I may do a series on projects using only the Plantin Schoolbook and Accent Essentials cartridges which come with the Cricut Expressions machine. I was almost forced to do this the other night because I sat to make the bags for Elliott's birthday party on Sunday (turning 3... I can't believe it!) and I realized that my neighbor is borrowing my Tags, Bags, Boxes, and More cartridge. She just recently went out and bought a Cricut Expressions because she really liked it when she saw me using it at my most recent paper party (and I might just have one more husband who isn't speaking to me, lol...), but I digress... Anyhow, as it often happens for those of us with munchkins and other time consuming daily responsibilities (which is probably all of us), I was crafting late at night and knew I couldn't just call her and ask to get it back. I remembered that the Plantin Schoolbook cartridge has bags in it, and to my great joy, I saw that the Roly Poly option would create a nice square bag the kind that I was looking for. So here is the party bag design I made for my sweet boy's birthday party! These are what the kids will take their treats home in.

Goodie Bag (A Plantin Schoolbook Cricut Cartridge Project):

1. Hit the roly poly option, then the bag. Set your size to 5 1/2". This size will cut two bags on one 12x12 piece of cardstock even though if you try to cut a quantity of 2, it will tell you it doesn't fit. The machine is just being weird on this, I suppose. Cut the image, hit the line return button, then repeat last, and cut the same exact image again. My cardstock is kind of a dark brownish gray. I can't quite describe the color. It was from an earthtone textured cardstock package I picked up at Walmart.

These are the pieces I cut:
Star: 1 plain (blue), 1 shadow (black), both at 2 1/2"
Circle: 1 plain (red), 1 shadow (black), both at 2 1/4"

-In case you're not quite familiar with the Cricut, using the shadow option cuts an image slightly bigger than the size you select. You don't need to set your size larger to get that larger size when using the shadow button. In fact, trying to create this shadowed effect by just using a larger size doesn't always work--especially in letters.

-When choosing your sizes, remember that your chosen measurement is how tall your finished image will be. (Think of the fact that cutting a 2" letter A yields a 2" tall letter A.)

2. Glue and layer your pieces as shown below.

Here is the finished goodie bag without any extra embellishment:


3. Embellish with chosen items. I used a stamped, embossed, colored, and cut image from the Cupcakes clear stamp collection from The Paper Company.


Finished bags:


I've decided not to put El's name or stats (such as a 3 or whatever) on these bags because I would like for them to be reuseable. I really like how this turned out (and I was just as surprised as anyone else at just how cute these are, lol). You know, I think these could work as a small bag for a teenager, or as a super cute way to give a gift card to someone.

I'm feeling really kind of pushed to start figuring out more uses for these two cartridges now! I'll be posting more projects as I come up with them. (Likely a birthday banner pretty soon.)

Wednesday, August 19, 2009

Photo Corner Tutorial

Continuing on my ecological/economical scrapping kick, here's a tutorial I put together on how to make your own photo corners. Photo corners are such a popular adornment in scrapbooking. I rarely see ones that are meant to actually function as photo corners. More often, they're purely decorative and meant to put on the corner of some element in your design (not necessarily a photo, either!) to make it look more finished.

You can use these in card making or scrapbooking. I've done an example of pretty big photo corners in the tutorial because huge embellishments seem to be a fad that isn't fading any time soon. You could buy these, of course, or even buy punches to make them. But why not just make them yourself? Save some dough. Save some trees (read: use your scraps!).

Photo Corner Tutorial
Supplies:
Cardstock/paper of choice (I used a double sided paper from K & Company's Classic Designer Paper Pad)
Marker/Pen (I'm using an acid free sharpie pen because it soaks into the paper and dries quickly, but any other kind of felt tip pen will do)
Ink (for inking edges of finished photo corners, if desired) (I used a VersaMagic DewDrop in Jumbo Java)

Tools:
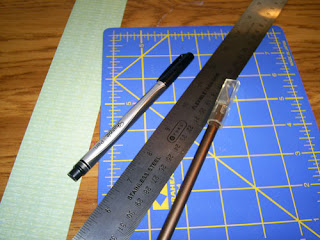
Metal ruler with cork bottom (for cutting... or just use a plastic ruler, but be warned: you might get frustrated from repeatedly cutting your ruler instead of your paper)
Craft knife with sharp blade (as in if you haven't changed the blade in five years, CHANGE it. The old, dull blade is why you hate cutting with the craft knife.)
Cutting mat (mine is a very small quilting mat picked up for about $7.00 in the quilting section at JoAnn)
Scissors


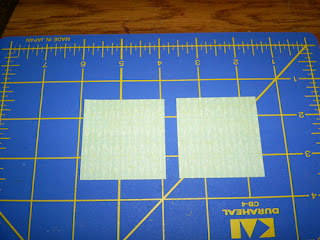
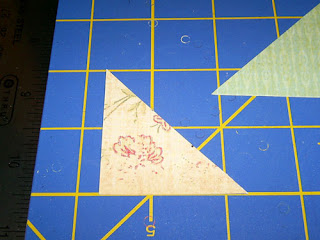
1. Decide on the finished size of your photo corners. Like I said, I was going for big, so I'm starting with 2" squares.


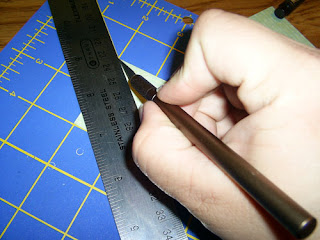
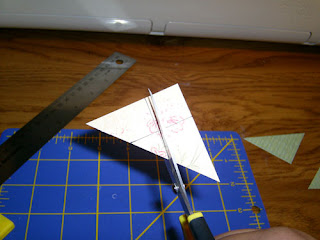
2. Slice the square from corner to corner using the ruler and the craft knife (with your SHARP blade, right?). My cutting mat has a handy-dandy 45 degree angle across it to help with cutting. I didn't find it helped so much, but you might find it useful to line yours up if you have one. Alternatively, if you just HATE your craft knife (but I really think you should try switching the blade out and give it another go), use the ruler and the marker to trace a line from corner to corner (on the BACK of the square), then cut that line with some scissors.


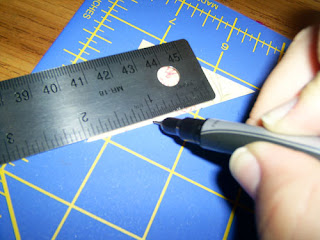
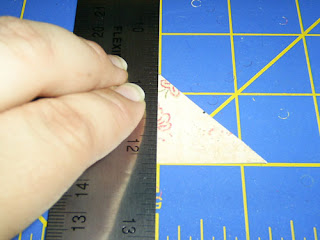
3. Measure from the very corner, along the longest side of your triangle, to the point at which you feel you'll make a good sized photo corner. I'm measuring one inch from the corner. (I'm using the 2" mark on my ruler as the 0" mark in this photo) Measure the same distance from both corners and make a mark on the BACK of the triangle.


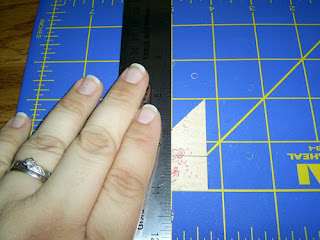
4. Using your cutting mat, line up the bottom of your triangle (looking at the back) with one of the horizontal grid marks. Line up one of your marks with a vertical grid mark, as pictured.


5. Line your ruler up along that vertical grid mark and draw a line from the top to the bottom of the triangle. Using the grid lines to line up your triangle/marks will allow you to draw lines at the right angles so that you'll create really nice looking photo corners.


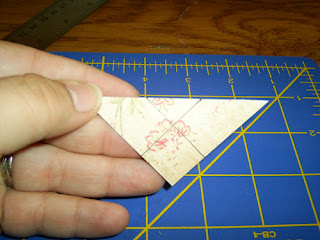
6. Do this same thing for your other mark, flipping the triangle around and lining everything up as showin in the photo above.


7. This is what you should end up with after doing steps 5 and 6.


8. Cut out the small triangle.


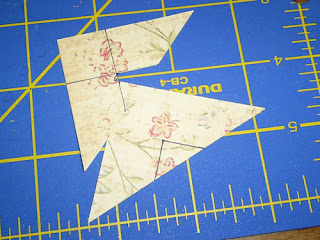
9. To make a second photo corner, you can save yourself some hassle by using the first one you just made. Line it up with the other triangle you have (from cutting the original square apart) and just trace the cut out part onto the uncut triangle (make sure to trace on the back!). To keep it the same size, when cutting this triangle, make sure that you're cutting on the outside of the traced line. Try to cut out the triangle in such a way that the little triangle keeps the black lines on it.


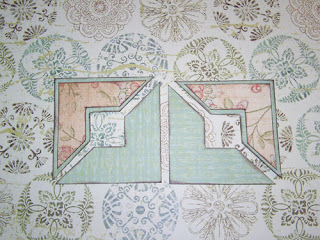
10. You can make different sizes and layer these together for cool looks. I inked all of the edges above with the Jumbo Java ink. The layered photo corners above were made starting with a 1 3/4" square which was cut into the larger triangles. Each triangle was then marked at 3"4 from each corner before the lines were drawn inside and the small inner triangles cut out. In general, a good proportioned photo corner seems to be one that is made by marking the cut triangles at 1/2 the measurement of the original square. For instance, in my example, I used a 2" square and marked from the corners of the cut triangles at 1" from each corner before drawing my lines and cutting. In order to make a nice layer (basically 1/8" all around), I just decreased all of the measurements by 1/4", just like you'd do for any scrapping project.

For tiny photo squares (say squares that start off at 3/4"), you can just eyeball and cut the squares in half with your scissors. Still mark and draw lines, however, to get a good look to the cut out piece in the middles.

Also, in order to make things easy on yourself: If you REALLY love a certain size and want to use a lot of them in your work, make yourself a template or two out of white cardstock. That way you can just make your square, cut it in half, and then use the template to draw the inner triangle and then cut that out.

Hopefully someone finds this useful! I'm going to make some fancy-schmancy glittery ones, and sequin covered ones... I'm having fun!

Wednesday, August 12, 2009

Spiral Binding Tutorial/Various Musings

This post is a real treat, I think. I'm going to share this little method I came up with for doing spiral binding. It's probably not new. In fact, I bet plenty of people smarter than I am have already figured out even better ways to do it. But I'll share it anyway!

First of all, though, here are a couple of pictures of things I've made recently. I've been writing in this old unruled composition notebook for a long time, filling it with various ideas and sketches from all branches of creative expression in which I currently participate. I had fun using some of my BasicGrey paper (from the Periphery collection) as well as some of the die cuts that came with the paper to create this simple journal cover. I used 1" skinny letters cut from my Storybook Cricut cartridge to spell out the words and added a couple of little rhinestones. I LOVE it! And it makes me laugh every time I look at it. I swear I'm not a snob! LoL. I think we all could benefit from personal pick-me-ups, though.


Below is a glittery snowflake I made while coming up with things to put on the board for my Glitter class at JoAnn. I'm going to give it a new holiday spin to get people into the idea of taking the class nearer to Christmas. It's going to be great, I think! Also, since I'm sort of in charge of doing decorations for the ladies' Christmas event this year at church, I'm thinking there will be about 120 of these on the trees for that event. I've got a lot of work to do between now and then, obviously. But what sweet little decorations/take home gifts! (At least I think they are!)


Okay... and what you've probably been waiting for...

Spiral Binding Tutorial
(I used pages cut from my Cricut Graphically Speaking cartridge, but you could adopt this technique to bind pages that you cut and punch holes in yourself. Although obviously it would take quite a bit longer.)

Materials:
Cardstock, double sided or single sided (if using single sided, you won't have to glue pages together or make as many pages, but your final piece will feel more flimsy)
20 gauge craft wire in your choice of color
Glue

Tools:
Graphically Speaking Cricut Cartridge (or slide cutter and hole punches)
10mm wooden dowel (or size fitting your chosen amount of papers)
Wire cutters
Round nose pliers
Pen or marker


1. Start off by cutting your pages. Mine are cut at 5.5" from the Graphically Speaking cartridge (shift, "1" button). You'll get four to a 12x12 page this way. If not using the cartridge, cut your pages to the same size and then punch holes evenly along edges. Use first piece of punched cardstock as a template for punching the rest of your pages. In order to make sure the holes will line up if using single sided cardstock, put two pages wrong sides facing (white sides facing) before punching.

2. If using the single sided cardstock, go ahead and glue all of the pages back to back to form the double thickness pages for your project.


3. Line up your paper so that the holes are going straight across the dowel rod. (To choose the right size, look at the size of your paper stack as well as just how far the holes are from the edge of the paper. Your spiral needs to be large enough to accomodate the pages as you open them, so that each page can lie flat. Your wrapped spiral will spring out just a bit, but not by much. Just make sure to get a dowel that's big enough!) Using your marker or pen, mark on the inside of each hole onto the dowel as shown below. This will show you where to wrap your wire.

4. Make sure to make at least three extra marks on each end of the page. (Move the page and line up the holes with the marks already made.) This will ensure that you still have enough wire after it springs, but also give you some extra wiggle room at the end.


5. Leaving a long tail at one end, and holding the dowel tightly, begin to wrap about 3-4 feet of wire (for a project about 6" tall... mine is 5.5") around the wood, meeting each wrap at a marked point on the rod. If you need to, move your hand up as you wrap, but keep in mind that the wire will spring out a bit from the wood when you move your hand. Just move it into position along your marks and continue. Wrap until you've wrapped wire around each mark, including the extras. When finished, carefully slide the wire coil off of the dowel.


6. In order to bind your piece smoothly, you'll need to clip an end of the wire coil so that the end is going with the natural curve of the coil, as shown in the picture below. You don't want a long tail. This will not work unless your end is curling with the coil.


7. This is the exciting part!!! Stack all of your pages together, facing the front cover towards you. Before messing with your wire, take a second to look through the holes and make sure they're all unobstructed. Working from the back to the front, insert that curved end of the coil into the top hole of your pages.


8. Turning the coil clockwise, begin to thread it through the holes in your binding. Mine went through surprisingly easily! If you hit a place where it's not quite going through, just wiggle gently and check again to make sure the holes are clear. Just continue turning the coil clockwise until you have the coil through all of the holes on your project.


9. Go ahead and clip the wires so that you're left with almost another entire coil at each end. (It may be helpful to clip only one end at a time.)


10. Take your round nose pliers and form a loop with the wire end, facing towards the outside of the book. Repeat on the other end. If you left enough wire at each end, you should have no problem with opening and closing your book. Just make sure your wire loop is big enough that it won't slip through the holes in the papers.


The finished open book: (I just had to show off these gorgeous papers from the DCWV Indian Summer collection!!!! It's not the BasicGrey Indian Summer collection... but I'll take what I can get. ^_~)

Also, after binding, you may notice certain spots in the wire spiral that aren't quite even. It's easy enough at this point to go along and pinch certain parts together or pull certain coils apart. Just don't get too paranoid about it or you might end up ruining your coil. You're just aiming for a smooth opening and closing.

Other ideas:
You could make these and punch only three or four holes in either end of your paper in order to save time and wire. Use a shorter coil and follow the exact same procedure at the top and bottom of your pages. You'll end up with two little pieces of spiral holding together your finished project, but it still looks cute!

Hang beads or other charms from the loops you formed at either end of your coil.

Match the color of your wire to the theme of your project. For instance, green or red for Christmas; or red or white for Valentine's Day; or silver or blue for Hanukkah.


Here it is all finished and closed up and ready to be embellished. I have no idea what it's going to become. Well, it's a mini album. But I'm not sure what it's about yet. I'll have to wait for a while and see. ^_^


I hope you enjoyed the tutorial! Make sure to leave comments if you have questions, and if you appreciate the post, become a follower! ^_^

Friday, August 7, 2009

Magazine Funk

I recently got my newest Creating Keepsakes magazine, which usually really motivates me to get going and get scrapping with many awesome new ideas for me to tweak and try in my own work.

However.... sometimes I go into what I can only describe as my "magazine funk". I flip through page after page of glorious designs seemingly from the same people every single month (Can we say, "Mou Saha"???? [And I'm not saying that meanly... I think I'm her biggest fan!]) and I just see, like, this glorious hierarchy of creative geniuses the likes of which I will never be...

And it puts me in a funk.

I don't know why I think I should be published in some magazine or admired by others in order to be "good" at what I do. I mean, essentially, what this is all about is doing what I love and recording my family's history and leaving a story behind for future generations who will love what "Grandma Canuel" did and to whom names the likes of Mou Saha will not mean a thing.

But still. I'm kind of in a funk today.

Although, I don't think it's 100% the magazine. I'm nearing the end of summer with an 8 year old and a nearly 3 year old, both boys, who have been running me ragged for quite a while. I'm watching my grandma's sick doggie while she's visiting my aunt in California. I'm a bit overwhelmed and a bit overworked, perhaps, and even buying my brand new Graphically Speaking cartridge today at Hobby Lobby with some hard earned JoAnn teaching money isn't making it all go away. Maybe that's the real reason all of this is bothering me.

Maybe all of this is just to say how much I really NEED to sit and scrap. Maybe this is all pointing even brighter and more obviously to the fact that I need to sit and not think about my house which is actually pretty well taken care of (all laundry and dishes currently done... yee!) or my crazy kids, one of whom is just about to go down for his nap.

Maybe I should stop looking at what other people do as the unattainable goal I seem to think it is and look at it more as an inappropriate goal. I mean, why the heck should I want to scrap like Mou Saha? Why in the world don't I just scrap the way I scrap? Why not spend more time figuring out exactly how it is I scrap? Why is what I like to do suddenly feeling not good enough? Why is what I naturally love suddenly feeling boring? Is it because what I do doesn't look like what other people do? Isn't that totally awesome, though? Shouldn't I be kind of jumping up and down and feeling a bit thrilled that my own style is starting to develop?

I think that maybe I should try to forget the magazines. I should even try to forget Mou Saha (who I would SO love to send some chocolate to) and her glorious work which I adore... Just for a while. Maybe I shouldn't pick up a book. Or look at a magazine. Or search for project ideas online.

I think that maybe, just maybe, I need some time to find a little bit more of myself. After all, I don't think this is a process which we should ever feel is complete. Each day, each new experience, each frustration, triumph, joy, and heartache adds yet more layers to each one of us--layers that deserve to be explored. I think I really should just play for a while without thinking of making something good enough for a magazine. I'll just create for the sake of creating.

You know, I'm reminded of a story my choir teacher in high school read to us. It was basically about a little cricuit who, through the entire story was longing to be a butterfly. She constantly was saying, "I wish I was a butterfly." She sought out the wise old owl of the forest who essentially told her that she was made for singing, and she was special because of that. And her heart was filled with so much joy, she began chirping and singing a beautiful song. At the very end of the story, a butterfly happened to be flying by, heard the song, and thought wistfully, "What beautiful music! I wish I was a cricuit."

Anyway... I guess none of us are more beautiful and desirable than when we are who we truly are. Why should we try to be anything else?

Wednesday, August 5, 2009

QTip Box Project/Box Template

I had a super productive day yesterday around my house. A lot of my time was spent reorganizing my scrapping space (again). I made a whole bunch of folders (top row of my tall, thin cabinet thingie to the left) which I'm teaching in my Scrapbook Social at JoAnn this month. I also made a row of boxes based on the gift bag template I taught at last month's Scrapbook Social. I made labels for the folders and boxes, just printed off of the computer, and really like the way everything looks now, all neatly in place and labeled! I'm such a dork!


Here's a closer shot of the tall shelf thingie I have next to my desk, along with the new label I made for my paper scraps binder, which is also now sitting on my desk instead of the floor. The top row of folders is holding all of my pre-made cards and card blanks. That row of boxes underneath is holding basic things that used to be floating around in my drawers without a real home. Unfilled mini albums, unfinished projects, things I'm saving to cover later, etc. Freeing up all of the space in my drawers (from the cards and the random stuff) allowed me to move most of what was in these shelves before into drawers. Also, this is going with my new kick, right? The eco-crafting (ecological AND economical) by which I am using what I have ALREADY to do projects and whatnot. So instead of buying a bunch of expensive containers, I'm using what I have.


Notice the little plastic bin. The first decorated jar in there is holding punched shapes, and it used to be a bread machine yeast jar. The second bottle, the pill bottle, is holding pre decorated punched shapes, with glitter, or whatever. I haven't decorated it yet, but I will soon! The third and fourth jars up there are old spice jars that I didn't decorate because I thought they looked so pretty with their contents showing--the ribbon scrap jar and a jar full of tiny flower stems from some huge bunch of flowers I picked up on clearance one day months ago at JoAnn for, like, $1.00. You've probably seen little flower bunches like this around. I finally tore all the little flowers off for use in future projects. I saved the leaves, too, and threw the rest away. *gasp* This was one of those times when I KNEW I wasn't going to use what I had left over (all of the floral wires and whatnot), so I decided to go ahead and chuck it. You can think I'm a horrible person if you want to, but I have a slightly minimalist bent about my space and I like being able to actually WORK in it rather than letting it pile up with random crap I KNOW I'm not going to use. So some sacrifices must be made.

Anyway, anyway. I said there was a project and template here. So, here it is! This is a basic box template. You can follow this basic idea for creating a box of almost any size. Think of your finished box size (I wanted a box that was 2" wide from the front and 2" wide on the side and 3" high).

The measurements across the top of the box template represent side, front, side. The measurements down the length of the template represent height, side, height. If you wanted a box that was 4" wide from the front, 2" wide at the side, and 4" high, your template would stretch a bit. The panels across the top of the template would be 2", 4", 2". The measurements down the side of the template would be 4", 2", 4". SO... using some of that math you swore you'd never use as a kid, you can see your final template would need to be 8" wide and 10" long. You're always going to cut in the same place--those two middle lines that are outlined red in this template.

Now that I've explained (hopefully clearly) how you can create your own box template, we'll move forward with this specific size.

Kathy's Q-Tip Box

Here's the template:
Here is what-all you'll need for the project:
Glue (tape runners really don't cut it for this)
Sanding block (optional)
Buttons (optional)
Paper trimmer with cutting and scoring blades
Glorious paper worthy of your project (here I am using BasicGrey... I LOVE BasicGrey!)
Scissors
Bone Folder

1. You'll be using the buttons (if you want to) as feet for the box to make it look cooler. I decided to stack two buttons for each foot. You can do this without sanding, but your joins will be much better and stronger if you sand. Start off by sanding the back of the button that will be on the bottom. It will take the shine off of the button and allow the glue to stick much better. You can see the difference between the back of an unsanded button (below left) and the back of a sanded button (below right).


2. Sand the back AND front of the button being used as the top of your feet.


3. Glue the buttons as you want them for your feet. I used a smaller button on top of a larger button because the larger button is what I'm gluing to the bottom of the box, and it will create a cool tapered look to the feet.


4. Cut your paper to size according to the template and score all of the lines where indicated. Until you're familiar with how your scoring blade works, use a very gentle pressure when scoring. It's better to be gentle and have to go over the line a few times than to push too hard and tear right through it.


5. Cut where indicated, then fold all of the lines. (It really is easier to cut the lines BEFORE they're folded.) When you've done that, your piece should look something like the picture below.


6. If your paper has a very large or a particularly pretty un-repeated pattern, like mine does, you might want to do a dry run of your box to see which panels you want to be on the outside. This is what I did because this particular paper from BasicGrey has this awesome pattern that is simply gorgeous and I wanted as much of it on the outside as possible.


7. Begin gluing the box together. You can try to hide the little cut portion in between the two sides if you want to, or just go with it. I've never found that it matters that much, so do whatever floats your boat. When you glue both of the larger panels in place, it can be hard to get your fingers in there to push, so you might want to lay the box down and use your bone folder to push the panels together and make sure you have a good join. Make sure you wipe away any glue you might get onto your bone folder.


8. Here is a picture of the glued box. So pretty, isn't it!? You can make it fancier, if the insides will be seen at all, by using double sided paper or by stamping all over the back of the paper before you use it. But I wouldn't be paranoid about it.


9. Time to glue your feet on! Turn the box over and glue them at the four points, as I've shown here. If you sanded the buttons, they should stick pretty well. Once they're not sliding around anymore, flip the box over and let them dry with the box sitting on top of them.


The finished box in its new habitat!


I'm going kind of box crazy over here. Pretty soon my entire house is going to be full of these boxes. It's a great way to use up old pieces of cardstock you bought that are either slightly out of style now or just no longer to your taste. Or, like me, you could actually use your most precious hoarded papers in this kind of project. This way they're not being shoved in some album or mailed away on some card to people who can never appreciate what a sacrifice it was to give that piece of paper away. They're being displayed beautifully and functionally, and they'll make you smile every time you see them. ^_^

Monday, August 3, 2009

Scrapbooking, among other things

Most of us don't live in some remote mountain palace full of servants to attend to our every want, need, and whim. Most of us don't have people to do our dishes and laundry, to clean up the messes, or cook all of our meals for us. Most of us also don't live free of responsibilities to other people in our lives--most of those responsibilities usually dealing with the people right under our own roof.

I think most scrappers and paper crafters are like me. Not only do I not live in a far away, remote mountain dwelling--I live in a house right in the middle of a bustling metropolis. I don't have servants to do work here. I am, as I like to say, the busiest slave in the house. I don't have people to clean up my messes. In fact, I have people who make messes. I've got two kids. I think that pretty much sums it up--I have a LOT going on!

One of my greatest challenges is balancing my responsibilities to my family (as a full time SAHM) and my "real job" (as a part time papercrafts teacher at JoAnn) and myself! A lot of this might seem silly to those of you with B.O., or, "born organization" (that reference to you stinking is absolutely intentional, but meant in a joking way), but, nevertheless, I proceed...

How to get the housework done and still have time to crop? I've put together some of my own favorite tips, some "original" (at least, I thought of them myself, although they can't be new) and some definitely not.

Keep up on it! I know this seems obvious and silly, but as the most resistant-to-cleaning person who ever existed, who has been known to put things off for fear of "never" being finished, this was my major breakthrough. Just DOING the stuff gets it out of the way.
Dishes: Taking 5 minutes to load the dishwasher every night or taking another 5 or 10 minutes each night to clean up after dinner really does save a lot of work and heartache in the long run.
Laundry: Fold/hang while watching your favorite movies/TV shows. This is the only thing that gets me to do it. I bring a pile of hangers from every room and hang as I sort, then carry the already hung clothes to the rooms, along with the folded items. This is also an excuse to get some TV/movie time in, and I love it.
Take a note from Flylady: "I can do anything for 15 minutes!" If you don't know where to start, just set a timer for 15 minutes (lately I've pushed it down to 10 because it just feels shorter and nicer and I still get a LOT done) and clean. Load the dishwasher. Dump some clothes in the washer. (This means you get to pop a movie in later.) Do some sweeping. Change the trashes. You'll be amazed at what you can do. Check out her awesome organizational system for cleaning at www.flylady.net. It seriously changed my life.

Delegate! This is probably the hardest one for any of us to do, but it is probably also the one that has helped me out the most. I'm so lucky to have a very sweet, caring husband who understands (because he has seen for himself) that he gets 2 days off every week from work, and I get NONE. I mean, dishes, sweeping, laundry, and the like don't get a break and, if anything, having him AND the kids home all day makes even more work for me! I don't force him to do a ton of chores, by any means, but occasionally delegating a few tasks really helps me out and it helps me keep from getting overwhelmed! Also, I've got this strapping 8 year old son who is perfectly capable of doing any number of chores. And every time he complains about what he has to do, I offer to switch jobs with him, and that's typically the end of it. ^_~

Seek out and destroy time suckers! No, I'm not talking about your kids. Although some days they certainly seem to qualify. I'm talking about mindless watching of TV or activities that were a good idea in the beginning but have become little more than drains on your energy and sanity. Let me give a few personal examples.

Our family has become more and more guarded of our time together, but I have also learned to be more guarded about my personal time. For instance, I know that I will not be signing up for my church's women's Tuesday morning bible study this coming year. They're doing a study I really want to do, but I know that after the honeymoon period wears off, I'll be left with yet another responsibility (bible study homework) and yet another weekly mark on my calendar and will eventually be waking up on Tuesday mornings thinking, "UGH, I have to get ready, I have to get Elliott ready... when am I going to get the boards done for my next class..." And on and on and on. Also, I have to look at what this activity is really aiming to acheive. Closeness with God, obviously, which I attain in my day-to-day life as I pray and do my own personal study, so I don't need another activity to do that. It also is meant to acheive some friendship and intimacy with other women in my church. I run a kind of small group ministry at my church in which I already meet with other women and form relationships and all of that, so I don't need another activity to accomplish this. Although this is a hard decision, I've got to say that this coming year the Tuesday morning bible study isn't happening for me. If I get to the end of this school year and find that it left a gaping hole in my life, I can always sign up again the next year.

I was recently offered the papercrafting/scrapbooking teacher position at another JoAnn store. The potential for more income was a huge draw, of course, and the fact remains that I just LOVE to teach! I love the idea of getting more students. In the end, though, I had to decide that I wasn't going to do it. The draw on my time and energy, not just in the actual teaching time, but in showing up for the Teacher Open House days, making boards and supply lists for the classes (not to mention coming up with the classes themselves!), and all of that just left me thinking that it wasn't something I could take on.

I think there's a definite weighing process that we have to go through in order to decide what it is we will and won't do with our time. It's a precious commodity. Once it's spent, it can never be taken back again. It may mean rearranging the things you already do and even cutting some activities completely out of your life. It may mean committing less time to something you already do. The bottom line, I think, when deciding what you will and won't do is to ask yourself this: "Can I still be performing at 100% in every other area of my life if I add this?" Or, "Will no longer doing this allow me to start performing closer to 100% in all other areas of my life?" As long as you're still able to fully give of yourself in each area of your life, I think you will be able to strike the right balance.

Schedule time for yourself! No matter what your schedule primarily consists of, you MUST make time for yourself. Whether it's a certain block of time each day or a standing one hour every day that you spend for yourself, whatever time it should happen to start or end, it's very important to do this. Forget deserving it. You NEED it. If you're anything like me, your time spent creating is the best therapy. My entire world can be chaos, but for those moments, I can create order. I mean, I have my own personal relationship with God to let me feel general peace in my life even through crazy circumstances, but even still! I need this time to myself. It helps me to be the best person I can be in all areas of my life. And if taking less than 5% of any day can help me to perform at 100% for the rest of it, I'd say that's a worthwhile investment. Wouldn't you?

I feel sort of silly even posting this. I'm afraid of what other people might think about me for writing it, actually, because I am essentially admitting that I have trouble keeping a lot of things straight, and I don't run my house 100% by myself and I need help with organizing my cleaning schedule and, in general, I am not a B.O. kind of person. But I think a lot of it should be said. I think that MANY creatively bent people out there are so much like me and will never admit it. It comes from being more right brained than left brained--from becoming easily overwhelmed with the little things in life. From processing information so quickly that you can, as I once read in "Right Brained Children in a Left Brained World", get the answer without ever realizing the question. I'm also a very young woman still, I know (25 years old!), and a lot of this is just me still figuring things out like housework and working and caring for my family. In spite of what everyone seems to make you think, either intentionally or unintentionally, this stuff isn't just natural. We aren't just born knowing how to do everything. We DO need help!

It's important to keep all of our responsibilities in check, and to free up time for ourselves, and to not have a huge amount of chaos in our lives. If anything can help your scrapping/paper crafting, I believe it's that.